Fund Sources

Fund Sources

The Fund Sources module allows administrators to manage, view, and export the sources of funds that support solar projects. This ensures transparency in fund allocation and helps track contributions from different entities such as government agencies, private CSR initiatives, and beneficiaries.

Dashboard → Fund Source

Fund Sources

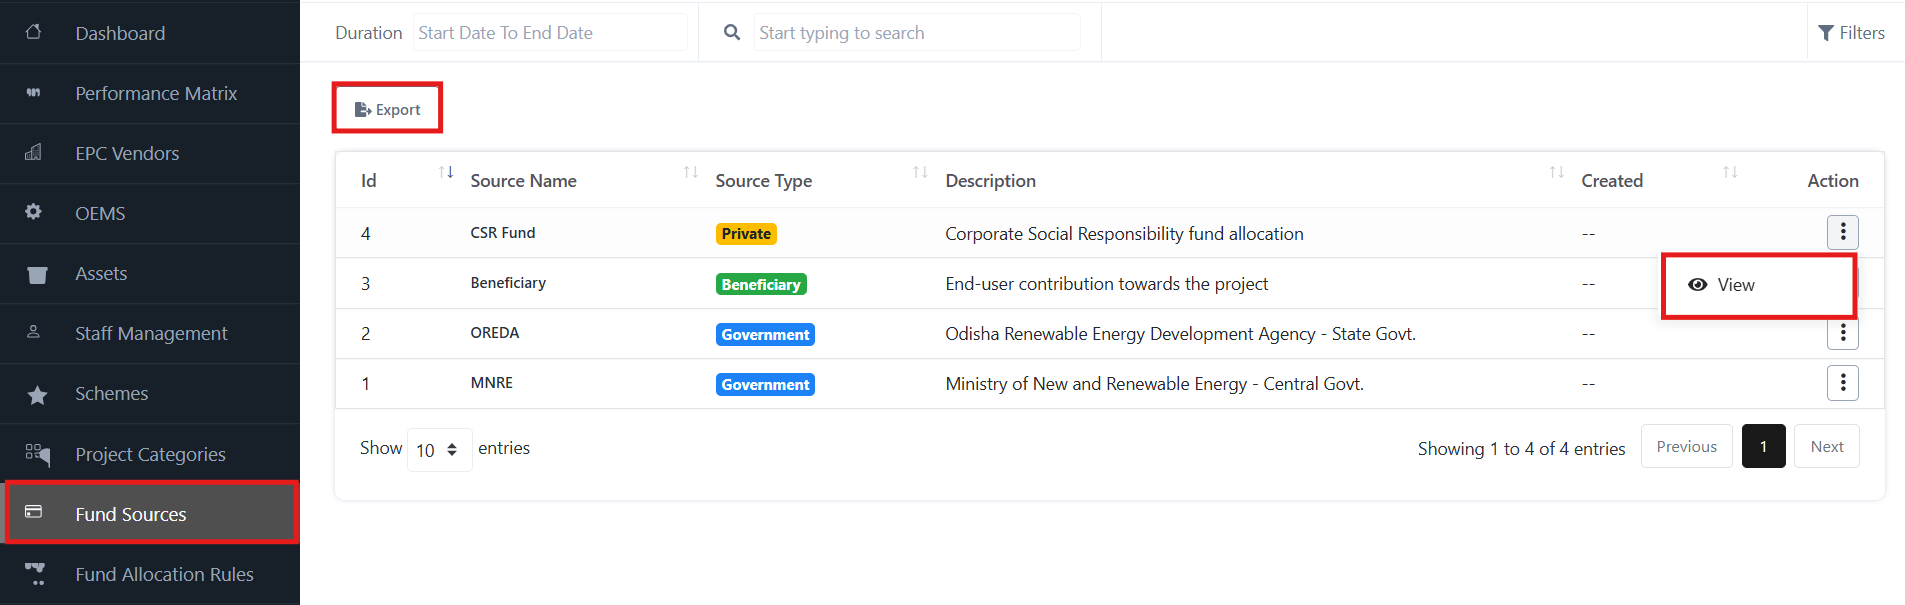
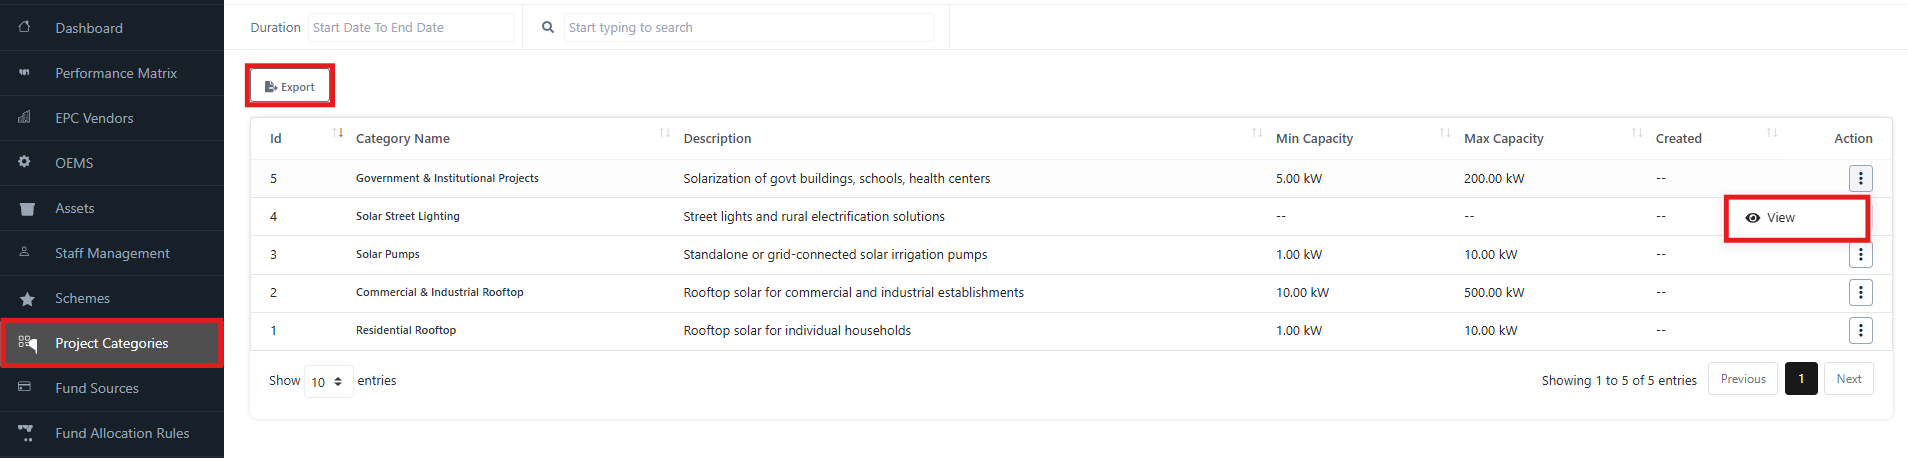
Fund Sources Overview

The Fund Source page displays all available fund source with the following details:

  • Id – Unique identifier for each source.
  • Source Name – The name of the fund source (e.g., CSR Fund, Beneficiary, OREDA).
  • Source Type – Indicates the type of source, such as Private, Government, or  Beneficiary.
  • Description – Additional details about the fund source.
  • Created – The creation date of the record.
  • Action – Provides options to view more details about the fund source.
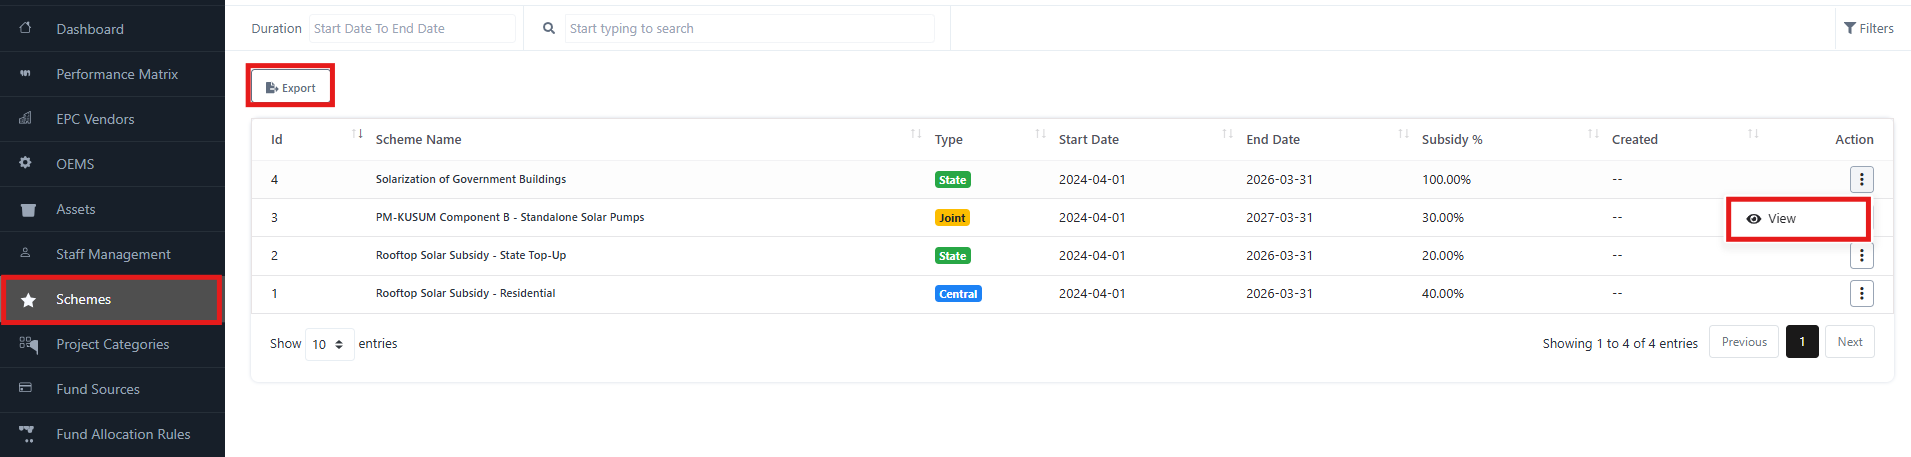
View Fund Source

To view detailed information about a fund source:

  • Navigate to the Action column.
  • Click on View.
  • The system will display complete details, including the type and description of the fund source.

Export Fund Sources

To download a list of all fund source:

  • Click on the Export button at the top.
  • Choose the desired export format (Excel, CSV, or PDF).
  • The file will be generated with all records of fund source.

With this module, admins can easily track contributions from Government Agencies, CSR initiatives, and Beneficiaries, ensuring clear and accurate fund management across projects.

Project Categories

Project Categories

The Project Category module helps administrators manage and classify solar projects into predefined categories. Each category is linked with capacity ranges and descriptions to streamline project planning and execution.

Dashboard → Project Categories

Project Categories

Project Category Overview

The Project Category page displays a list of all project category with details including:

  • Id – Unique identifier for the category.
  • Category Name – Name of the project category (e.g., Solar Pumps, Residential Rooftop).
  • Description – Brief details about the project type.
  • Min Capacity – Minimum eligible capacity for the project.
  • Max Capacity – Maximum eligible capacity for the project.
  • Created – Date of creation in the system.
  • Action – Provides an option to view category details.

Additionally, you can use the Export option to download all project category details.

View Project Category

To view details of a project category:

  • Go to the Action column beside the category.
  • Click View.
  • The system will display full information, including description, applicable capacity range, and category specifications.

Export Project Categories

To export project category details:

  • Click the Export button at the top.
  • Select the desired file format (Excel, CSV, or PDF).
  • The file will be generated with all project category records.

With this module, admins can classify projects into clear categories (e.g., Residential Rooftop, Solar Pumps, Industrial Rooftop), ensuring better tracking, reporting, and subsidy management.

Schemes

Schemes

The Schemes module allows administrators to manage solar subsidy and funding scheme. It provides details on scheme type, duration, subsidy percentage, and offers quick access to view scheme information.

Dashboard → Scheme

Schemes

Schemes Overview

On the Scheme page, you can view all the available subsidy scheme with the following details:

  • Id – Unique identifier of the scheme.
  • Scheme Name – The name of the scheme (e.g., Rooftop Solar Subsidy).
  • Type – Indicates whether it is State, Central, or Joint.
  • Start Date – The scheme’s effective start date.
  • End Date – The scheme’s expiry date.
  • Subsidy % – Percentage of subsidy provided under the scheme.
  • Created – Date the scheme was created in the system.
  • Action – Allows you to view scheme details.

You can also use the Export option to download scheme details.

View Schemes

To view details of a specific scheme:

  • Go to the Action column beside the scheme.
  • Click View.
  • The system will display complete details of the scheme, including its eligibility, subsidy structure, and duration.

Export Schemes

To export scheme details:

  • Click on the Export button on the top.
  • Select the desired export format (e.g., Excel, CSV, PDF).
  • The file will be generated with the list of all scheme.

With this module, admins can track and manage subsidy scheme, ensuring vendors and beneficiaries are mapped under the correct scheme.

Staff Management

Staff Management

The Staff Management module in SolarCRM allows administrators to manage system users, their roles, and access levels.

Dashboard → Staff Management

Staff Management

Staff Management Overview

The Staff Management page displays a list of all staff users in the system, along with details such as:

  • Name – The full name of the staff member.
  • Email – The registered email (used for login).
  • User Role – Role assigned (e.g., Auditor, Superadmin).
  • Status – Indicates whether the staff account is Active/Inactive.
  • Action – Options to Edit or Delete staff records.

You can also Add New Staff via the + Add Staff button.

Add Staff

To create a new staff account:

  • Click + Add Staff.
  • Fill in the required details:
    • Name – Enter the staff member’s name.
    • Email – Enter the login email (credentials will be sent here).
    • User Role – Select from available roles (e.g., Auditor, Superadmin).
    • Upload Picture – Optionally upload a staff profile picture.
  • Click Save to create the staff account.

Add Staff

Edit Staff

To update staff details:

  • From the Action menu beside the staff entry, click Edit.
  • Modify the required details (Name, Email, Role, or Picture).
  • Click Update/Save to apply the changes.

Delete Staff

To remove a staff member:

  • From the Action menu, click Delete.
  • Confirm the action.
  • The staff member will be removed from the system.

Use caution – deleting staff removes their system access.

With this module, admins can easily onboard, manage, and control access rights of team members across SolarCRM.

Assets

Assets

The Assets Module helps administrators manage and track assets such as equipment, tools, or items linked with projects. You can add new asset, view their details, edit existing records, or delete asset.

Accessing the Assets Module

  • From the Admin Dashboard sidebar, click on Asset.
  • The Asset list page will open, showing:
    • Asset Name
    • Price
    • Status (Active/Inactive)
    • Actions (View, Edit, Delete)

Assets

Key Features

1. Add a New Asset

  • Click on + Add Asset.
  • Fill in the required details in the Add Asset Form:
    • Name (mandatory): Enter the asset name.
    • SKU: Unique identifier for the asset.
    • Price (mandatory): Asset cost.
    • Purchase Price: Cost price of the asset.
    • HSN/SAC Code: Tax classification code.
    • Type: Select asset type (e.g., goods).
    • Status: Active or Inactive.
    • Opening Stock: Initial stock quantity.
    • Rate per Unit: Enter if applicable.
    • Allow Purchase: Choose Yes or No.
    • Track Inventory: Select Yes or No.
    • Description: Add a detailed description.
  • Click Save to create the asset.

Add a New Asset

2. View Asset Details

  • In the Asset list, click the Action (⋮) menu > View.
  • You will see full asset details, including:
    • Name, SKU, Price, Purchase Price
    • HSN/SAC Code, Type, Status
    • Opening Stock, Rate per Unit
    • Allow Purchase / Track Inventory
    • Created & Updated timestamps
    • Description

View Asset Details

3. Edit an Asset

  • From the Asset list, click the Action (⋮) menu > Edit.
  • Modify the fields as required (e.g., price, stock, status).
  • Click Update to save changes.

Edit an Asset

4. Delete an Asset

  • From the Asset list, click the Action (⋮) menu > Delete.
  • Confirm the deletion.

Note: Deleted assets are permanently removed and cannot be recovered.

5. Export Assets

  • Click Export to download the list of assets in a structured file format (CSV/Excel).

Quick Navigation

  • Assets List Page → Manage and view all asset.
  • + Add Asset → Create new asset.
  • View → Detailed record of an asset.
  • Edit → Modify asset details.
  • Delete → Remove asset permanently.

OEMS

OEMS

The OEMS module in the SolarCRM Admin Portal allows administrators to manage OEM details efficiently, including adding, editing, viewing, and deleting records of manufacturers.

Dashboard → OEMS

OEMS

1. OEMS Overview

  • Displays a list of OEMs with details such as:
    • Name
    • Company Name
    • Email
    • Phone
    • Status
  • Provides quick access to View, Edit, or Delete OEM records.
  • Includes filters (duration, search box) to refine results.

2. Add OEM

To add a new OEM:

  • Click on the “+ Add OEM” button.
  • Fill in the required fields:
    • Name – Full name of the OEM contact.
    • Email – OEM’s official email address.
    • Company Name – Legal entity or organization name.
    • Phone – Contact number.
    • Website – Official OEM website.
    • Billing Address – Address for billing purposes.
    • Shipping Address – Warehouse or delivery location.
    • Opening Balance – Initial financial balance (if applicable).
  • Click Save to add the OEM.

3. View OEM

To view OEM details:

  • Select View from the Action menu (three dots).
  • The OEM detail page displays:
    • Name & Contact Details
    • Company Information
    • Email, Website, Phone
    • Billing Address & Shipping Address
    • Financial Information (Opening Balance)
    • Created & Updated timestamps

This allows admins to quickly check OEM records without editing them.

View OEM

4. Edit OEM

To modify OEM details:

  • Select Edit from the Action menu.
  • Update the fields as required (Email, Company Name, Contact, Address, etc.).
  • Click Update to save changes.

5. Delete OEM

To remove an OEM from the system:

  • Select Delete from the Action menu.
  • Confirm the action.

Note: This action is permanent and cannot be undone.

6. Export OEM Records

  • Click on the Export button to download the list of OEMs in an external file (e.g., Excel/CSV).
  • Useful for reporting, audits, and compliance.

7. Status Indicators

  • Active – OEM is currently valid and operational.
  • Inactive – OEM is not available for transactions.